This post may contain affiliate links. Please see our disclosure policy.
These classic pannekaker (Norwegian pancakes) are a must-try for pancake fans. Delicately thin (like French-style crêpes), they have a richer flavour than crêpes and light texture but are just as easy to make. They are delicious with a host of toppings for breakfast, brunch or dessert – and ideal for Shrove Tuesday (pancake day)!
One of the incredible things about food is the sheer number of interpretations of one dish. Just look at how many different pancake recipes there are around the world! From classic British pancakes to Hong Kong-style mango pancakes – not forgetting American pancakes, Scotch pancakes and French crêpes (which I love turning into a strawberry mille crêpe cake!). However, there are so many lesser-known versions that really deserve more recognition outside of their home countries – like pannekaker…
Like any pancake, sometimes it takes a practice run to get the cooking right. But I always write off the first one as a ‘chef’s perk’ anyway. My top tips would be: a) not to use too much batter. Pannekaker are very thin. You just need enough to cover the base of your pan in an even layer; b) keep an eye on the heat. You want it to be on medium so the pannekaker cooks but doesn’t burn; and c) be patient! Don’t be tempted to flip it too early. If it isn’t set, it will tear and you will end up with a rather crumpled looking mess. It will still taste delicious, but not look as pretty.
If you are wondering whether you need a special pan to make pannekaker, the answer is ‘no’. While a pancake pan will make it easier to flip them as they have low sides, it isn’t a necessity. Just use your best non-stick frying pan.
Table of Contents
Why you will love this recipe:
- They are simple to make. The prep time is minimal.
- They are perfect for a sweet breakfast, brunch, light dessert or Shrove Tuesday (pancake day) treat.
- They use budget-friendly ingredients you are likely to already have at home.
- They are versatile. Enjoy getting creative with different toppings.
Ingredients:
Full recipe can be found in the printable recipe card at the bottom of the post, just scroll down!
Milk – opt for full-fat for the best results. This helps ensure your pannekaker batter has the correct consistency.
Plain flour – also known as ‘all-purpose’ flour. This gives structure to the pannekaker batter.
Butter – I use it to grease the pan to prevent the pannekaker from sticking as it has a better flavour than oil. You can also add a knob on top of the warm pannekaker just before serving for richness.
Substitutions and Variations:
Sugar: you can use any kind of sugar you like in this recipe. Granulated or golden caster will work just as well (you won’t notice much difference in the pannekaker batter or compote). Alternatively, opt for soft light brown sugar for a more caramel flavour.
Berries: I love my pannekaker with a raspberry compote, but you can use whatever berries you like. I tend to go for what is in season if I am using fresh. However, frozen work really well too (and are much more affordable). Strawberries, blueberries, blackberries, pitted cherries or mixed berries are all delicious. Alternatively, Bonne Maman has a lovely cherry compote – or you could add a spoonful of warm jam if you want a super quick cheat’s version. If serving to adults, cherries in kirsch feel very luxurious.
Cream: a dollop of softly whipped cream is a delicious accompaniment to pannekaker. You can also serve with clotted cream, mascarpone or for something tangier, try sour cream, crème fraîche or yoghurt.
Chocolate: these pannekaker are irresistible drizzled with melted chocolate. Dark, milk or white chocolate are all great depending on personal tastes.
Toppings: just like British pancakes you can try all sorts of toppings with these pannekaker. Nutella is a firm favourite of mine, so is Lotus Biscoff, my easy homemade pistachio cream or easy lemon curd for a zesty twist. You can also serve with a drizzle of maple syrup or runny honey, if you prefer.
Go savoury: you can also serve these pannekaker with savoury toppings/fillings. I like grated cheese and/or ham. Or you can go down the smoked salmon and cream cheese/sour cream/crème fraîche route.
Here’s how to make delicious Pannekaker:
Here’s a step by step guide for what you need to do, but you can find the full recipe at the bottom of the page for detailed instructions.
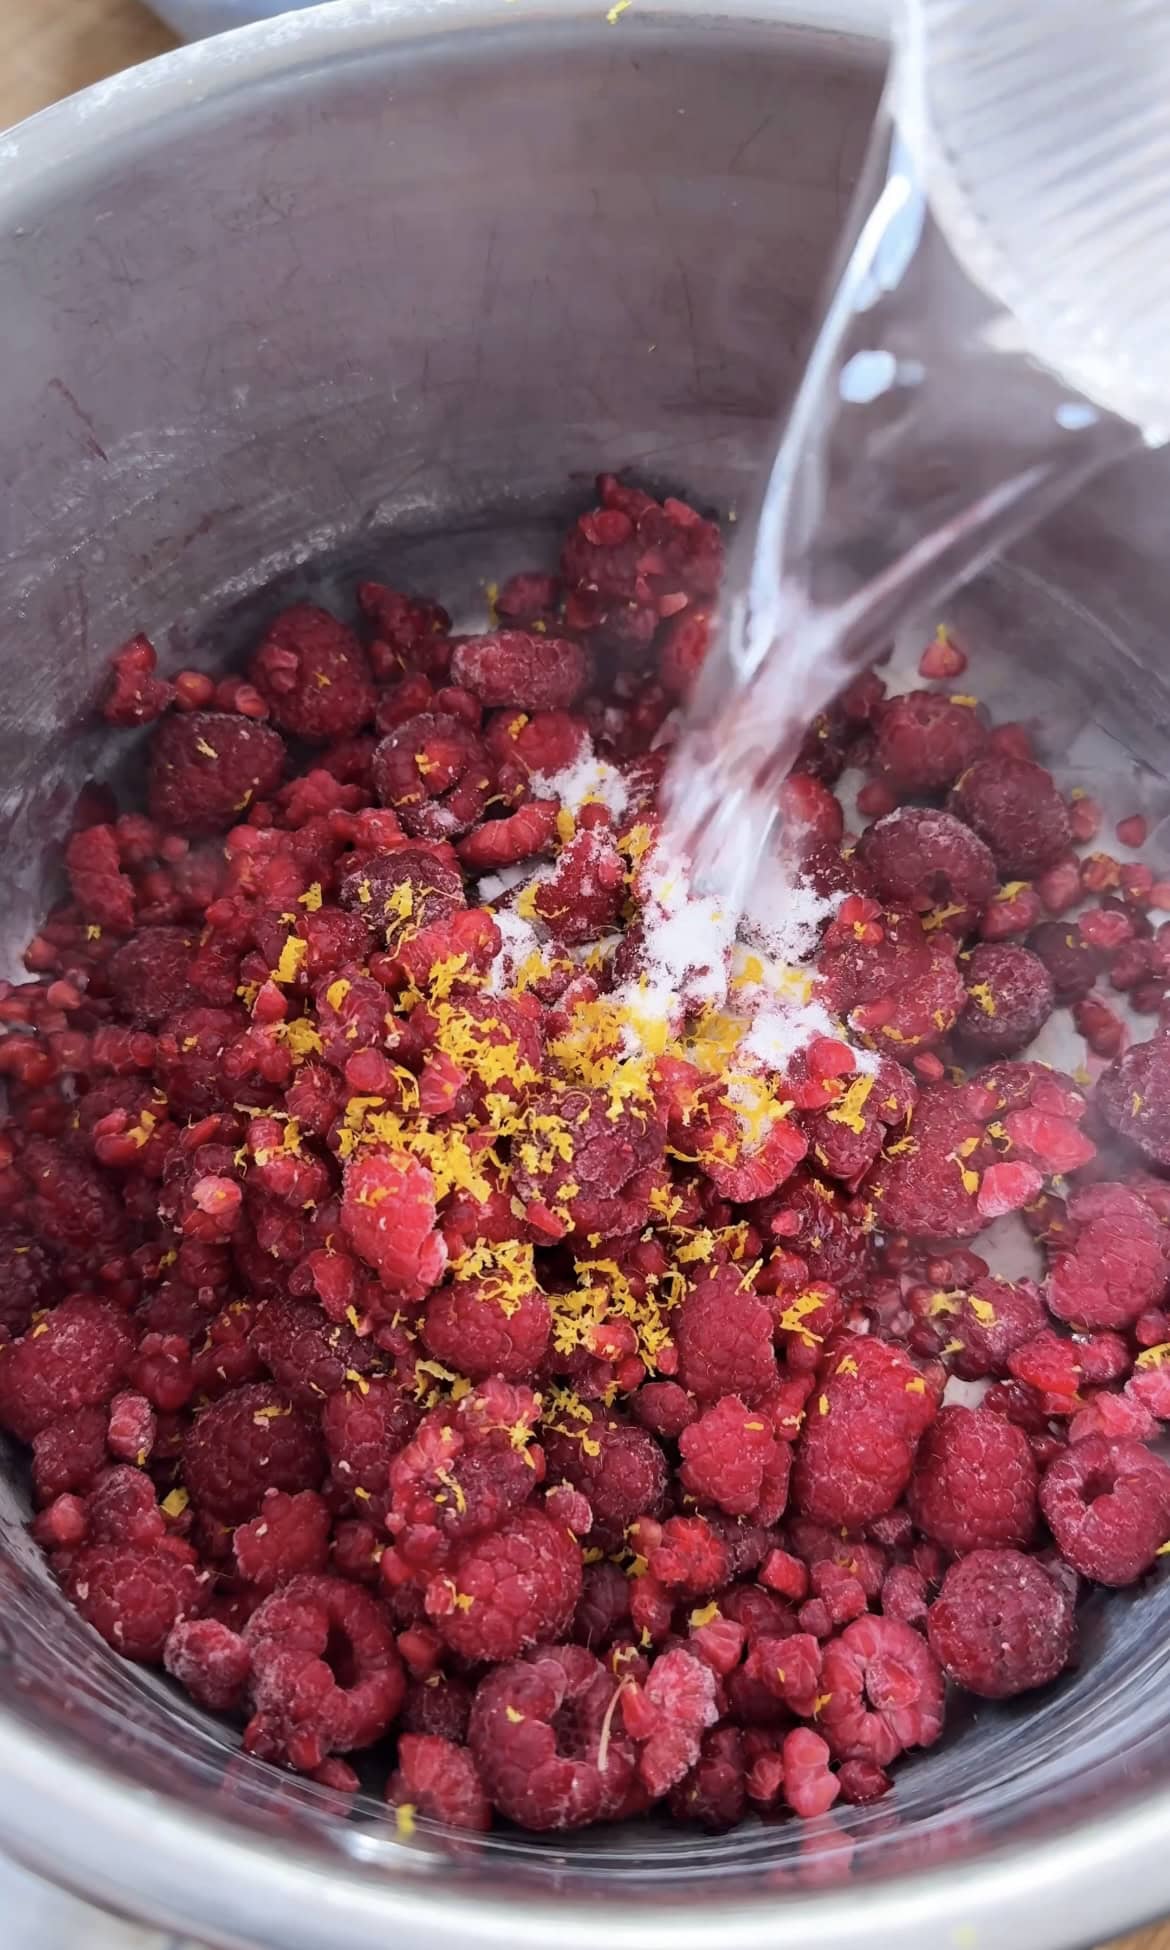
ONE: Make the raspberry coulis: tip the raspberries into a medium-sized saucepan. Add the caster sugar, lemon zest and 1 tbsp water. Place over a low-medium heat and slowly bring to the boil, stirring occasionally until the sugar dissolves.
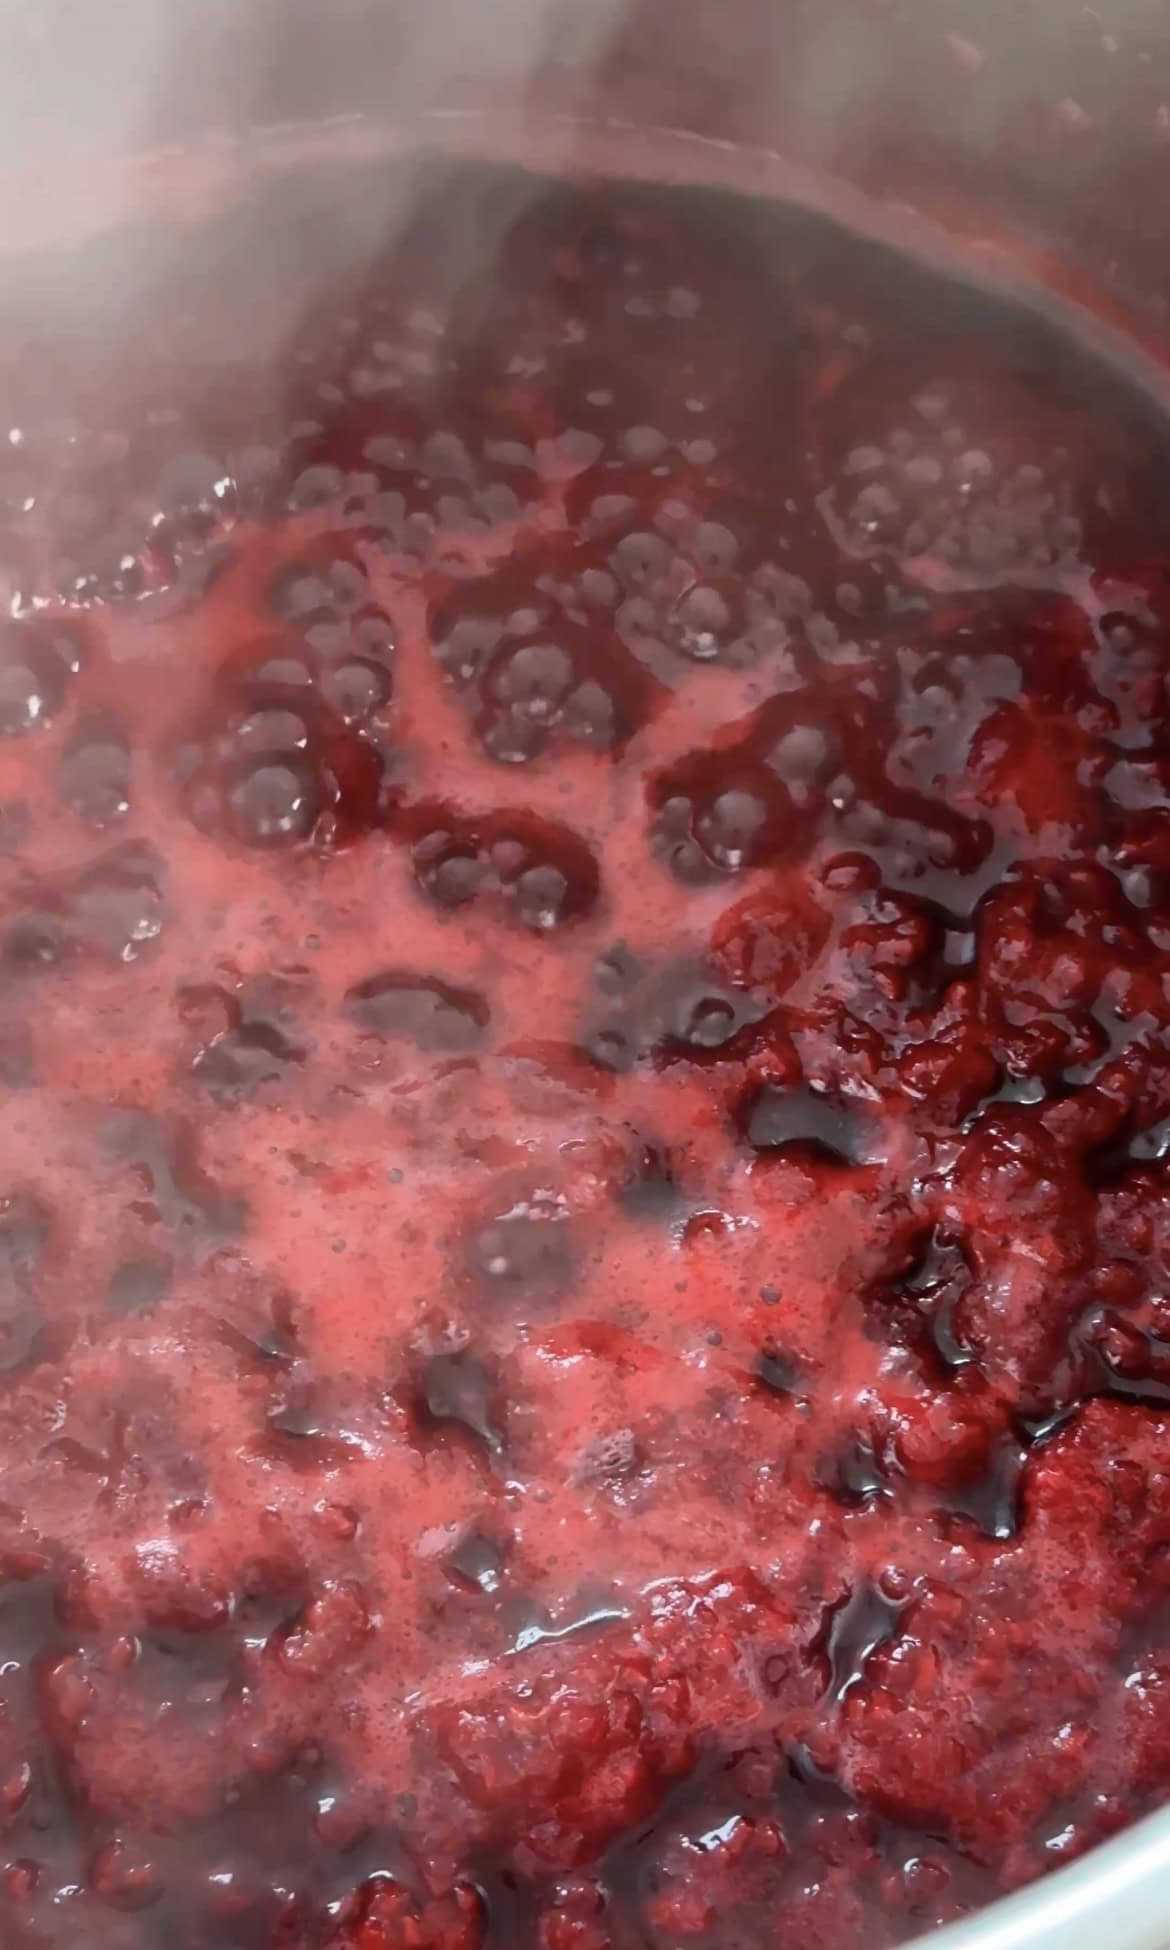
TWO: Once simmering, reduce the heat and cook gently for about 5 minutes – or until the raspberries have softened. Remove the raspberries from the heat and add lemon juice, to taste. Adjust the sweetness, if necessary. Pour into a bowl and set aside.
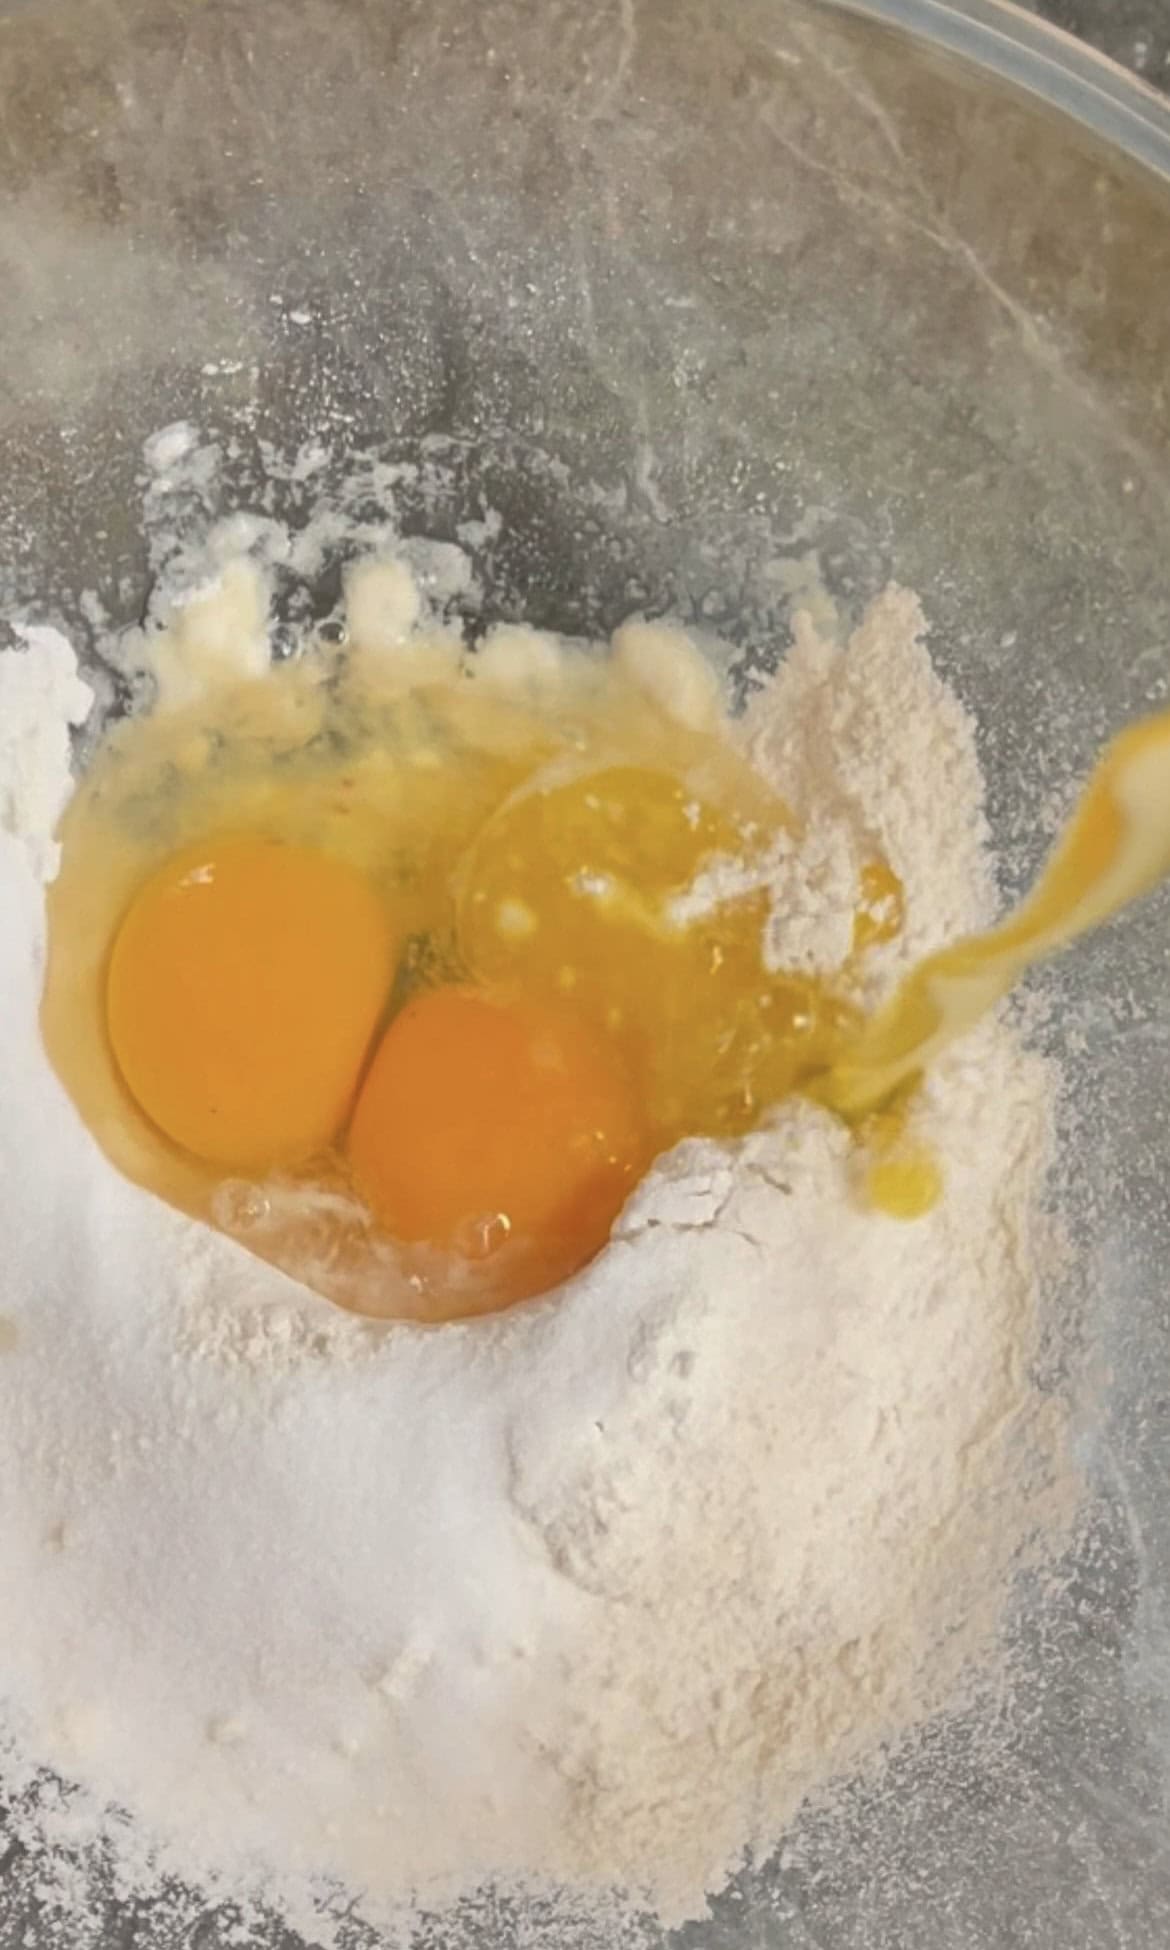
THREE: Simply mix together the flour, sugar and salt. Make a well in the centre and crack in your eggs. Add the melted butter and whisk well. Then add the milk and whisk again to bring it all together.
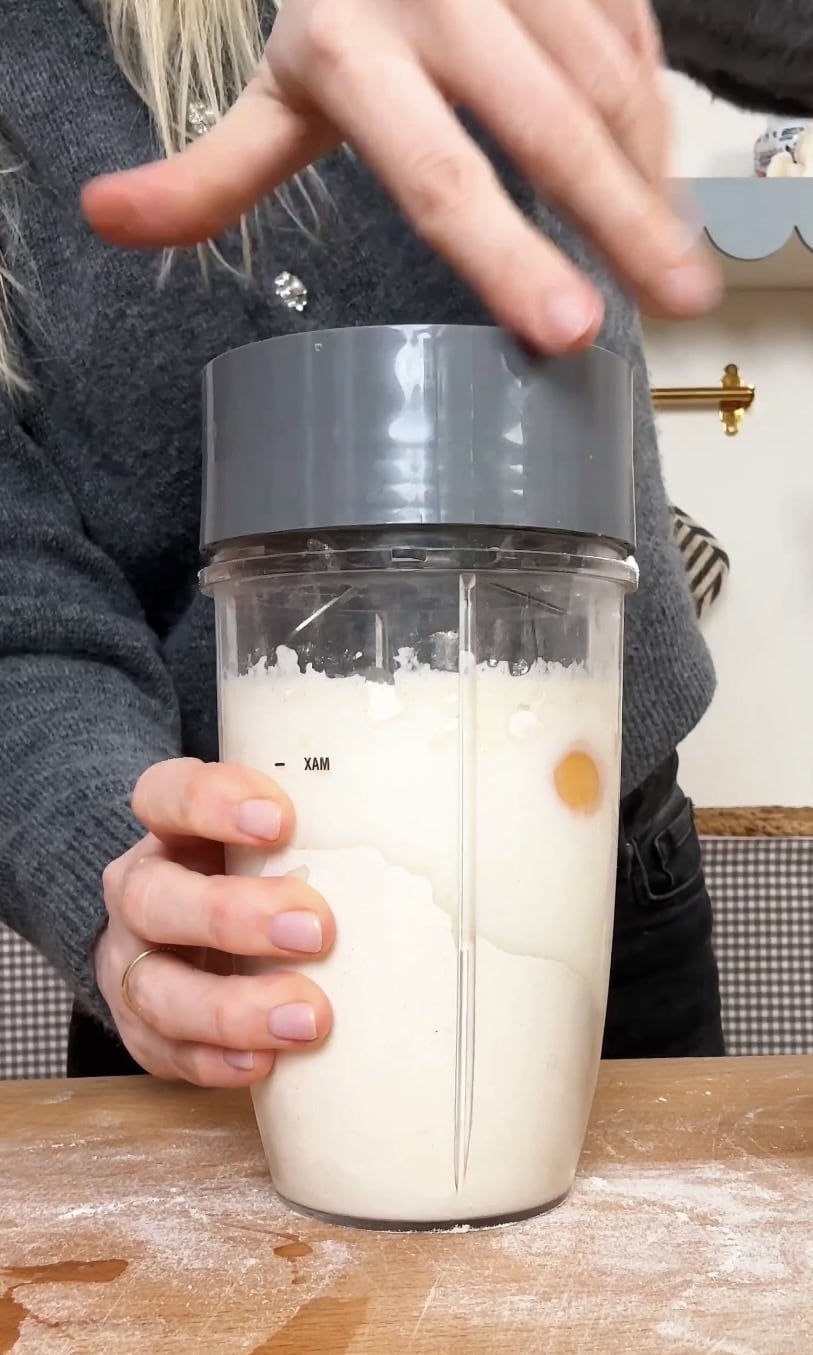
FOUR: Alternatively, add all ingredients to a blender and blitz until smooth.

FIVE: Heat a nonstick frying pan over medium-high heat and then grease with butter using a scrunched-up bit of kitchen paper.
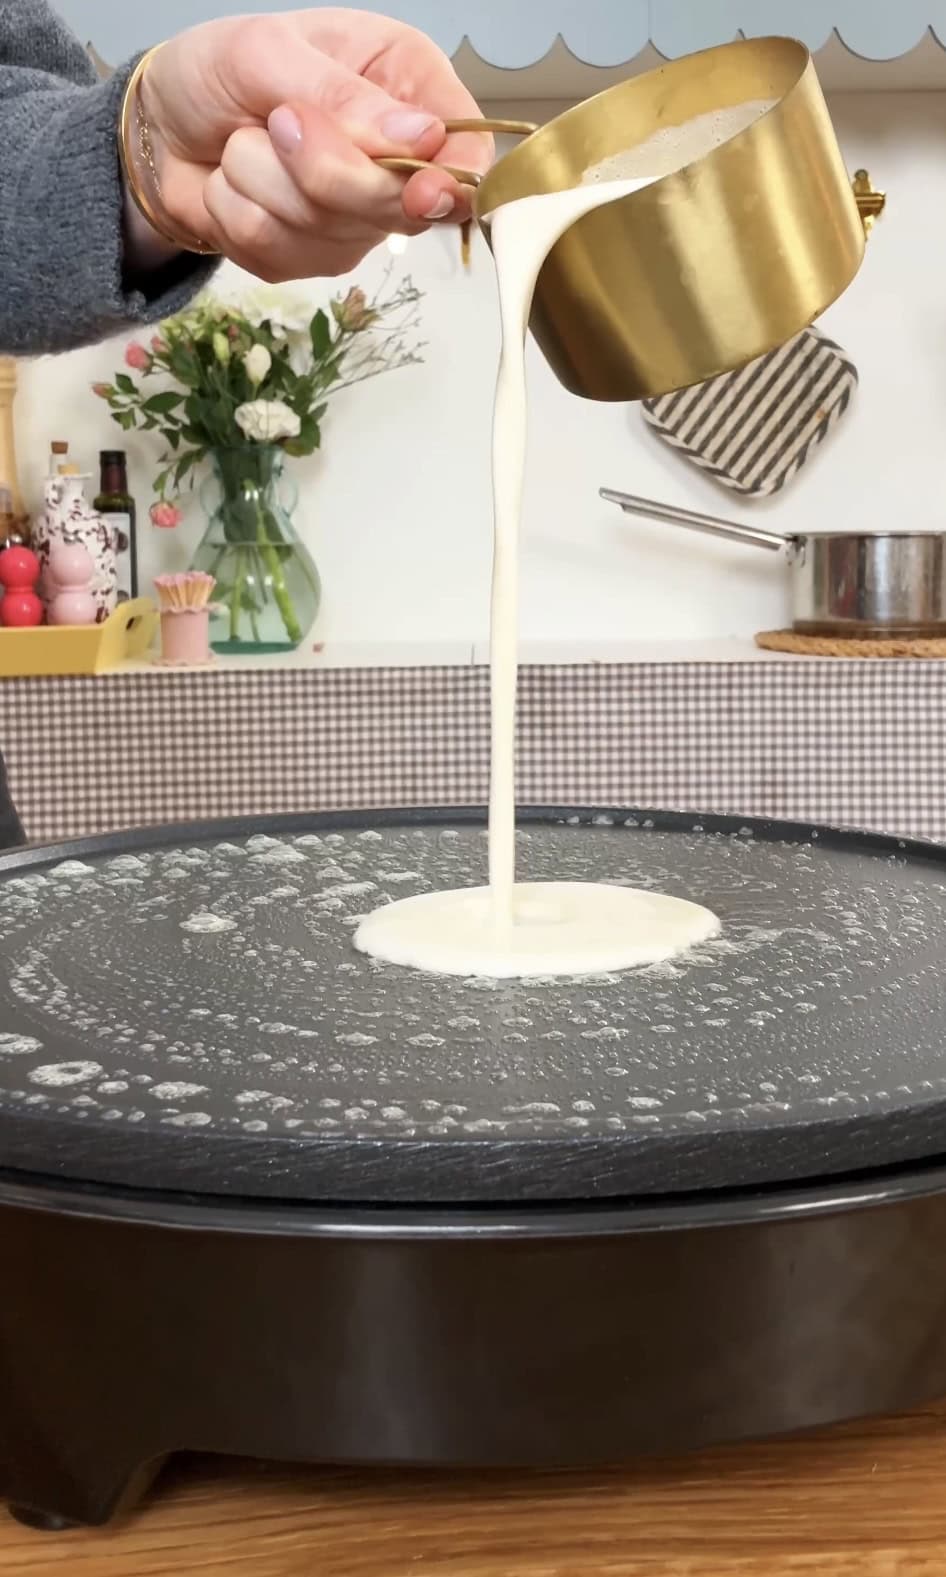
SIX: Use a ladle and add batter to the pan. Getting the right amount of batter in the pan is a bit of trial and error. Remember that the first pancake never turns out right – it’s a scientific fact, so don’t stress and then just enjoy it as a chef’s perk.
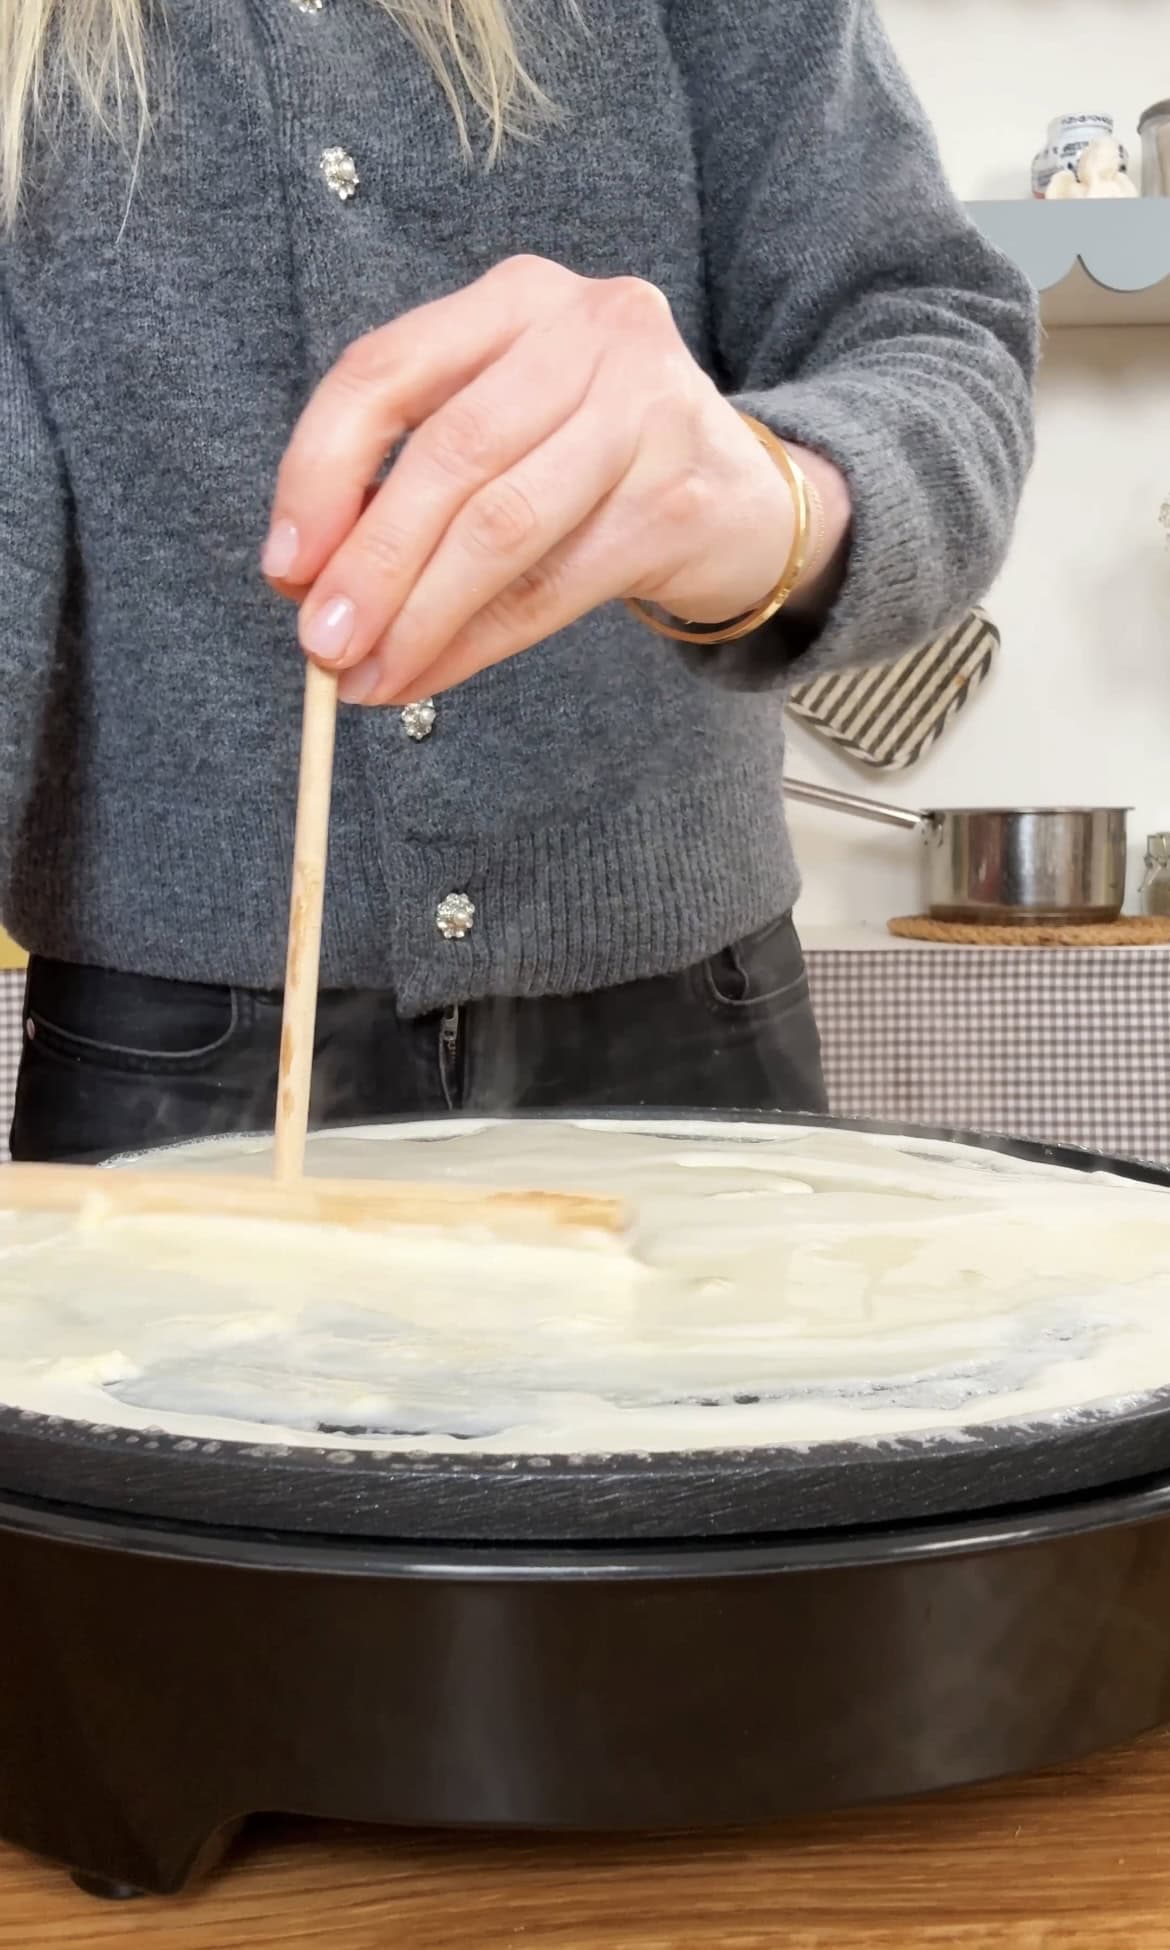
SEVEN: Use a wooden crêpe spreader or hold the man and tilt it to spread the batter across the base of the pan.
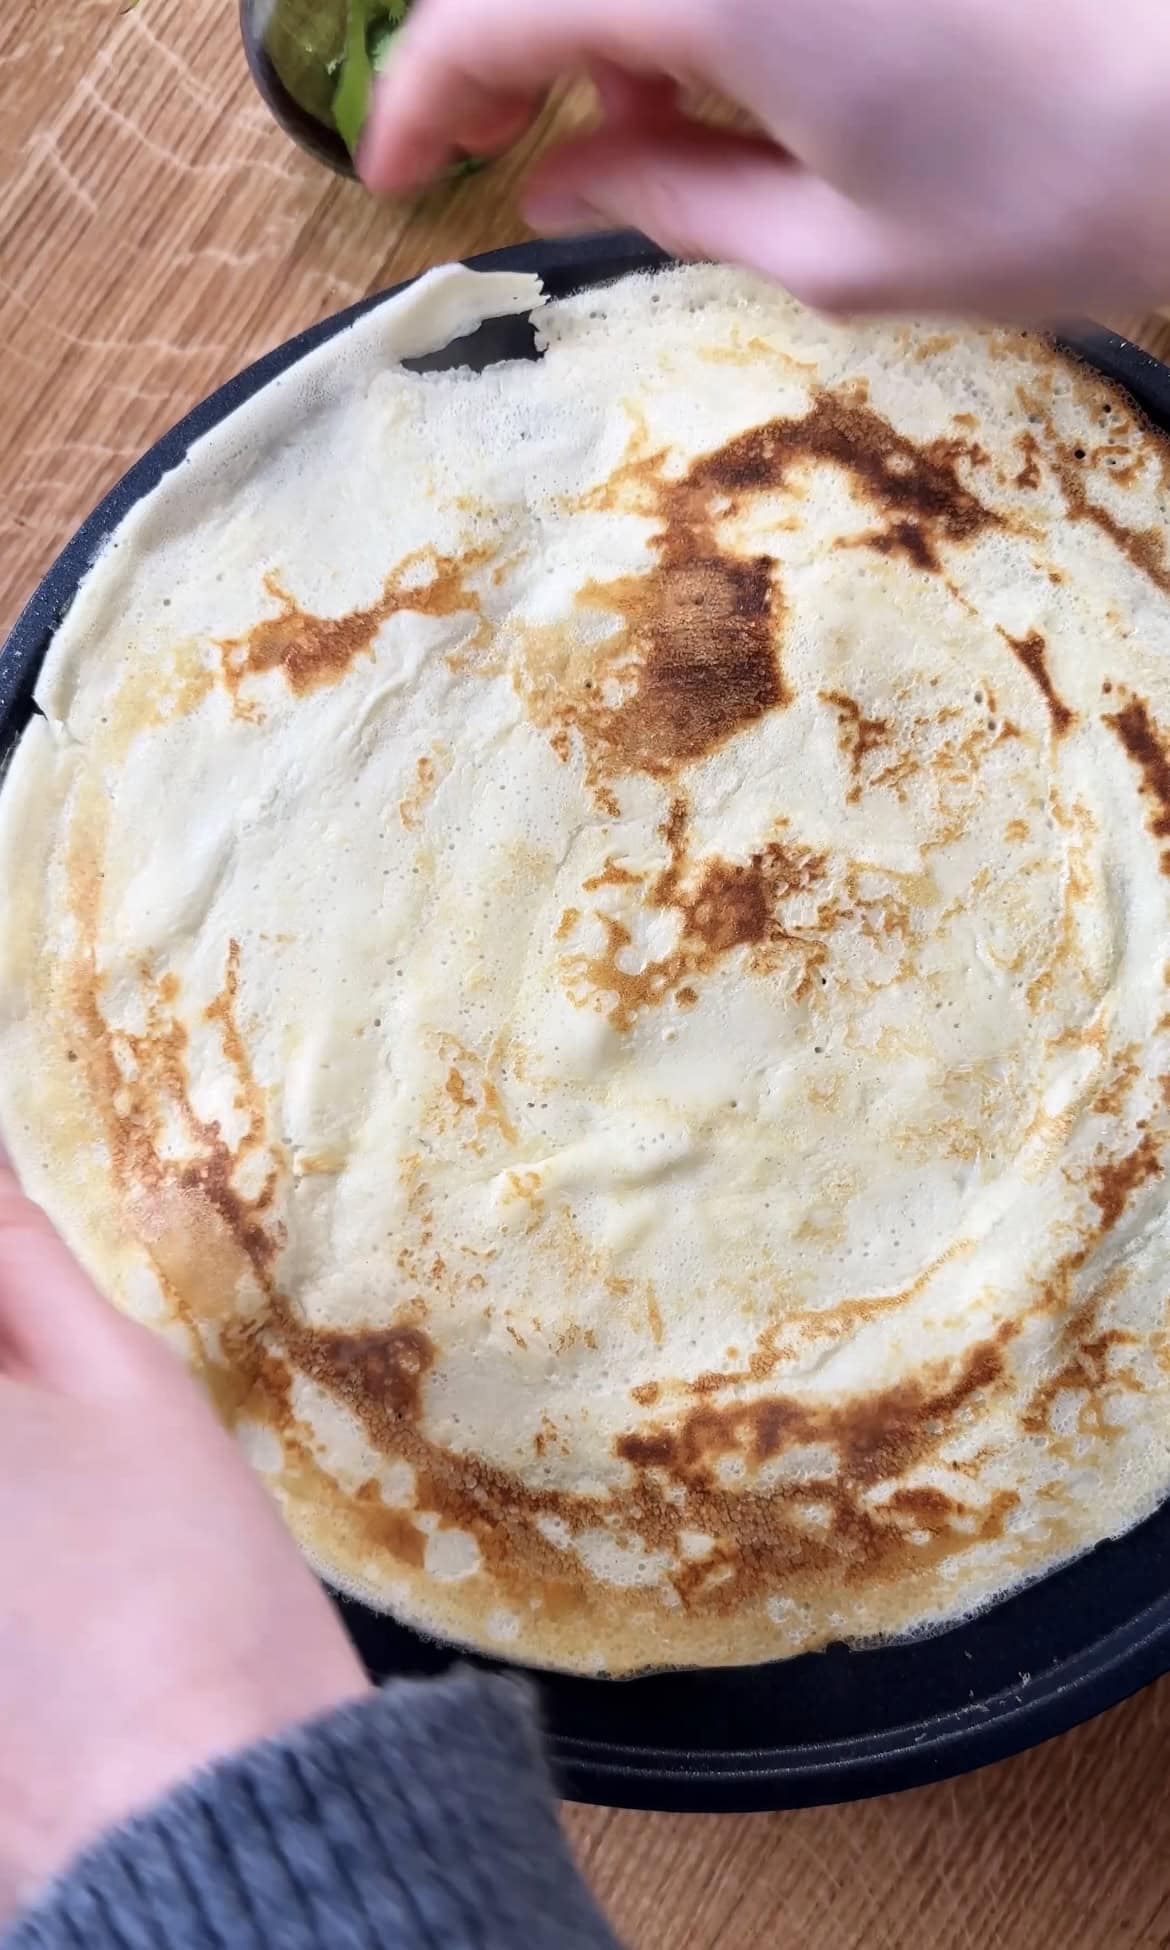
EIGHT: Cook for 30 seconds or so without touching it, then loosen the edges and flip! Cook for another 30 seconds or so until it’s a lovely colour and then slide onto a plate.

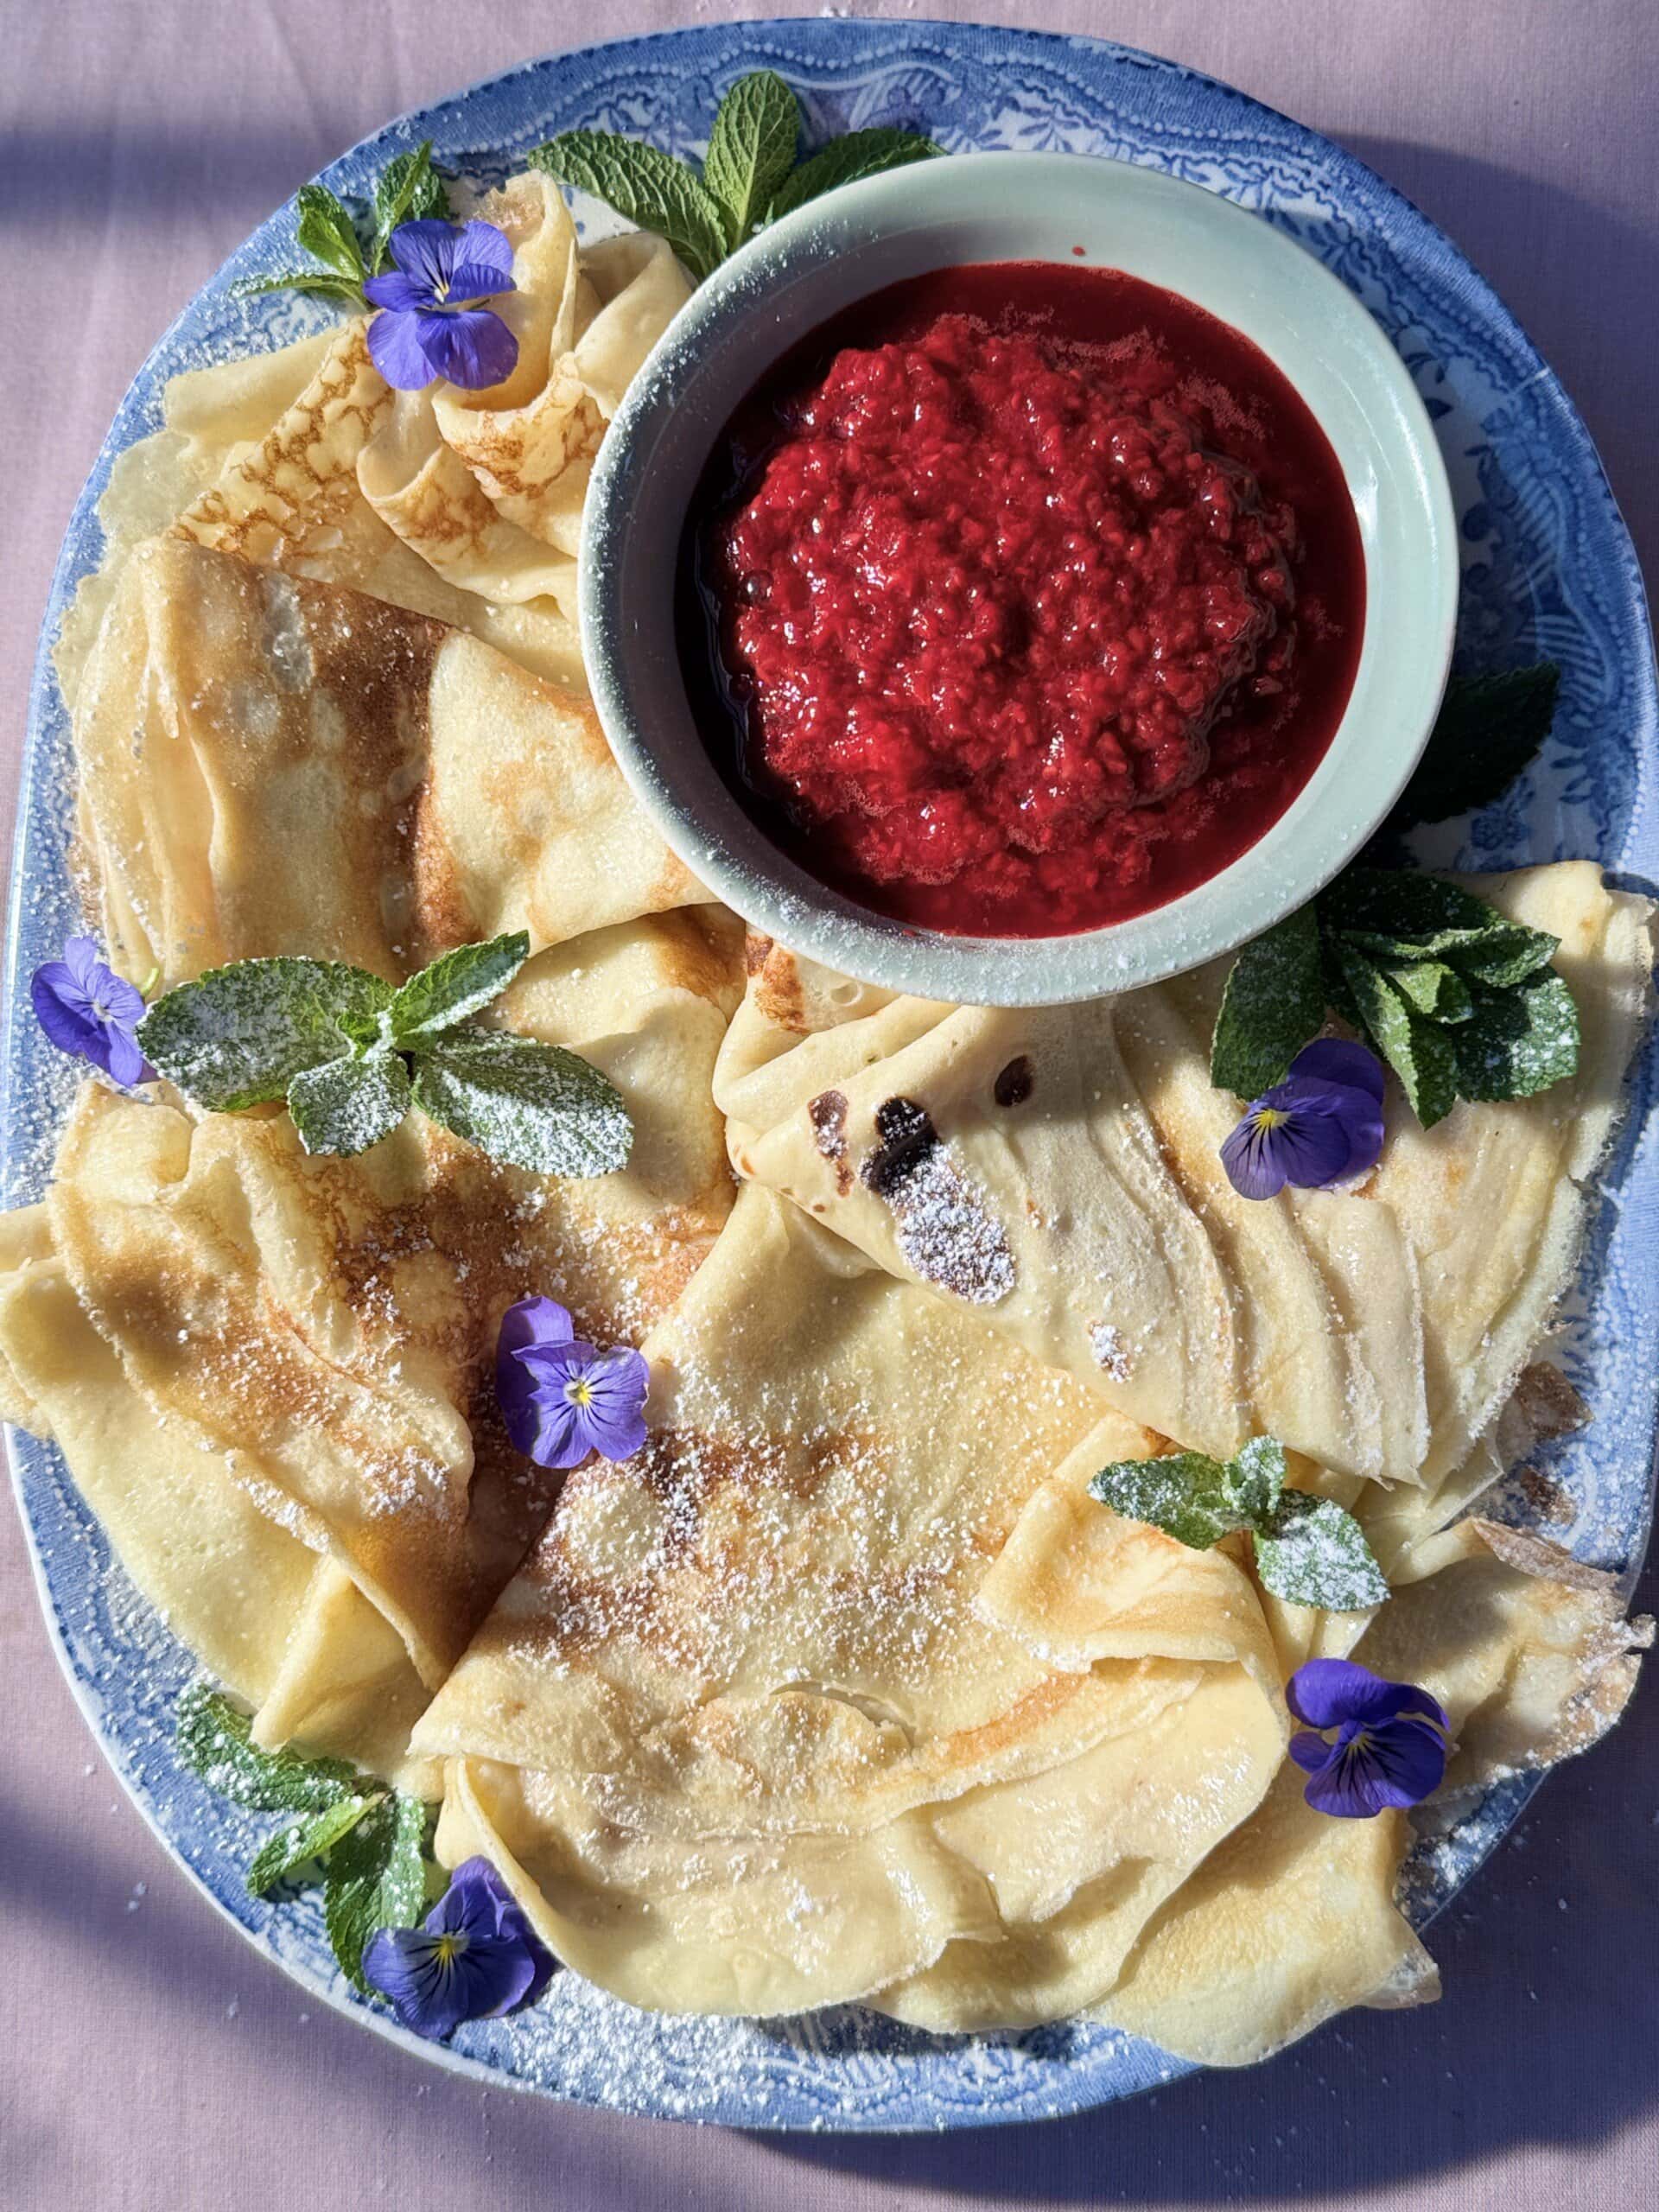
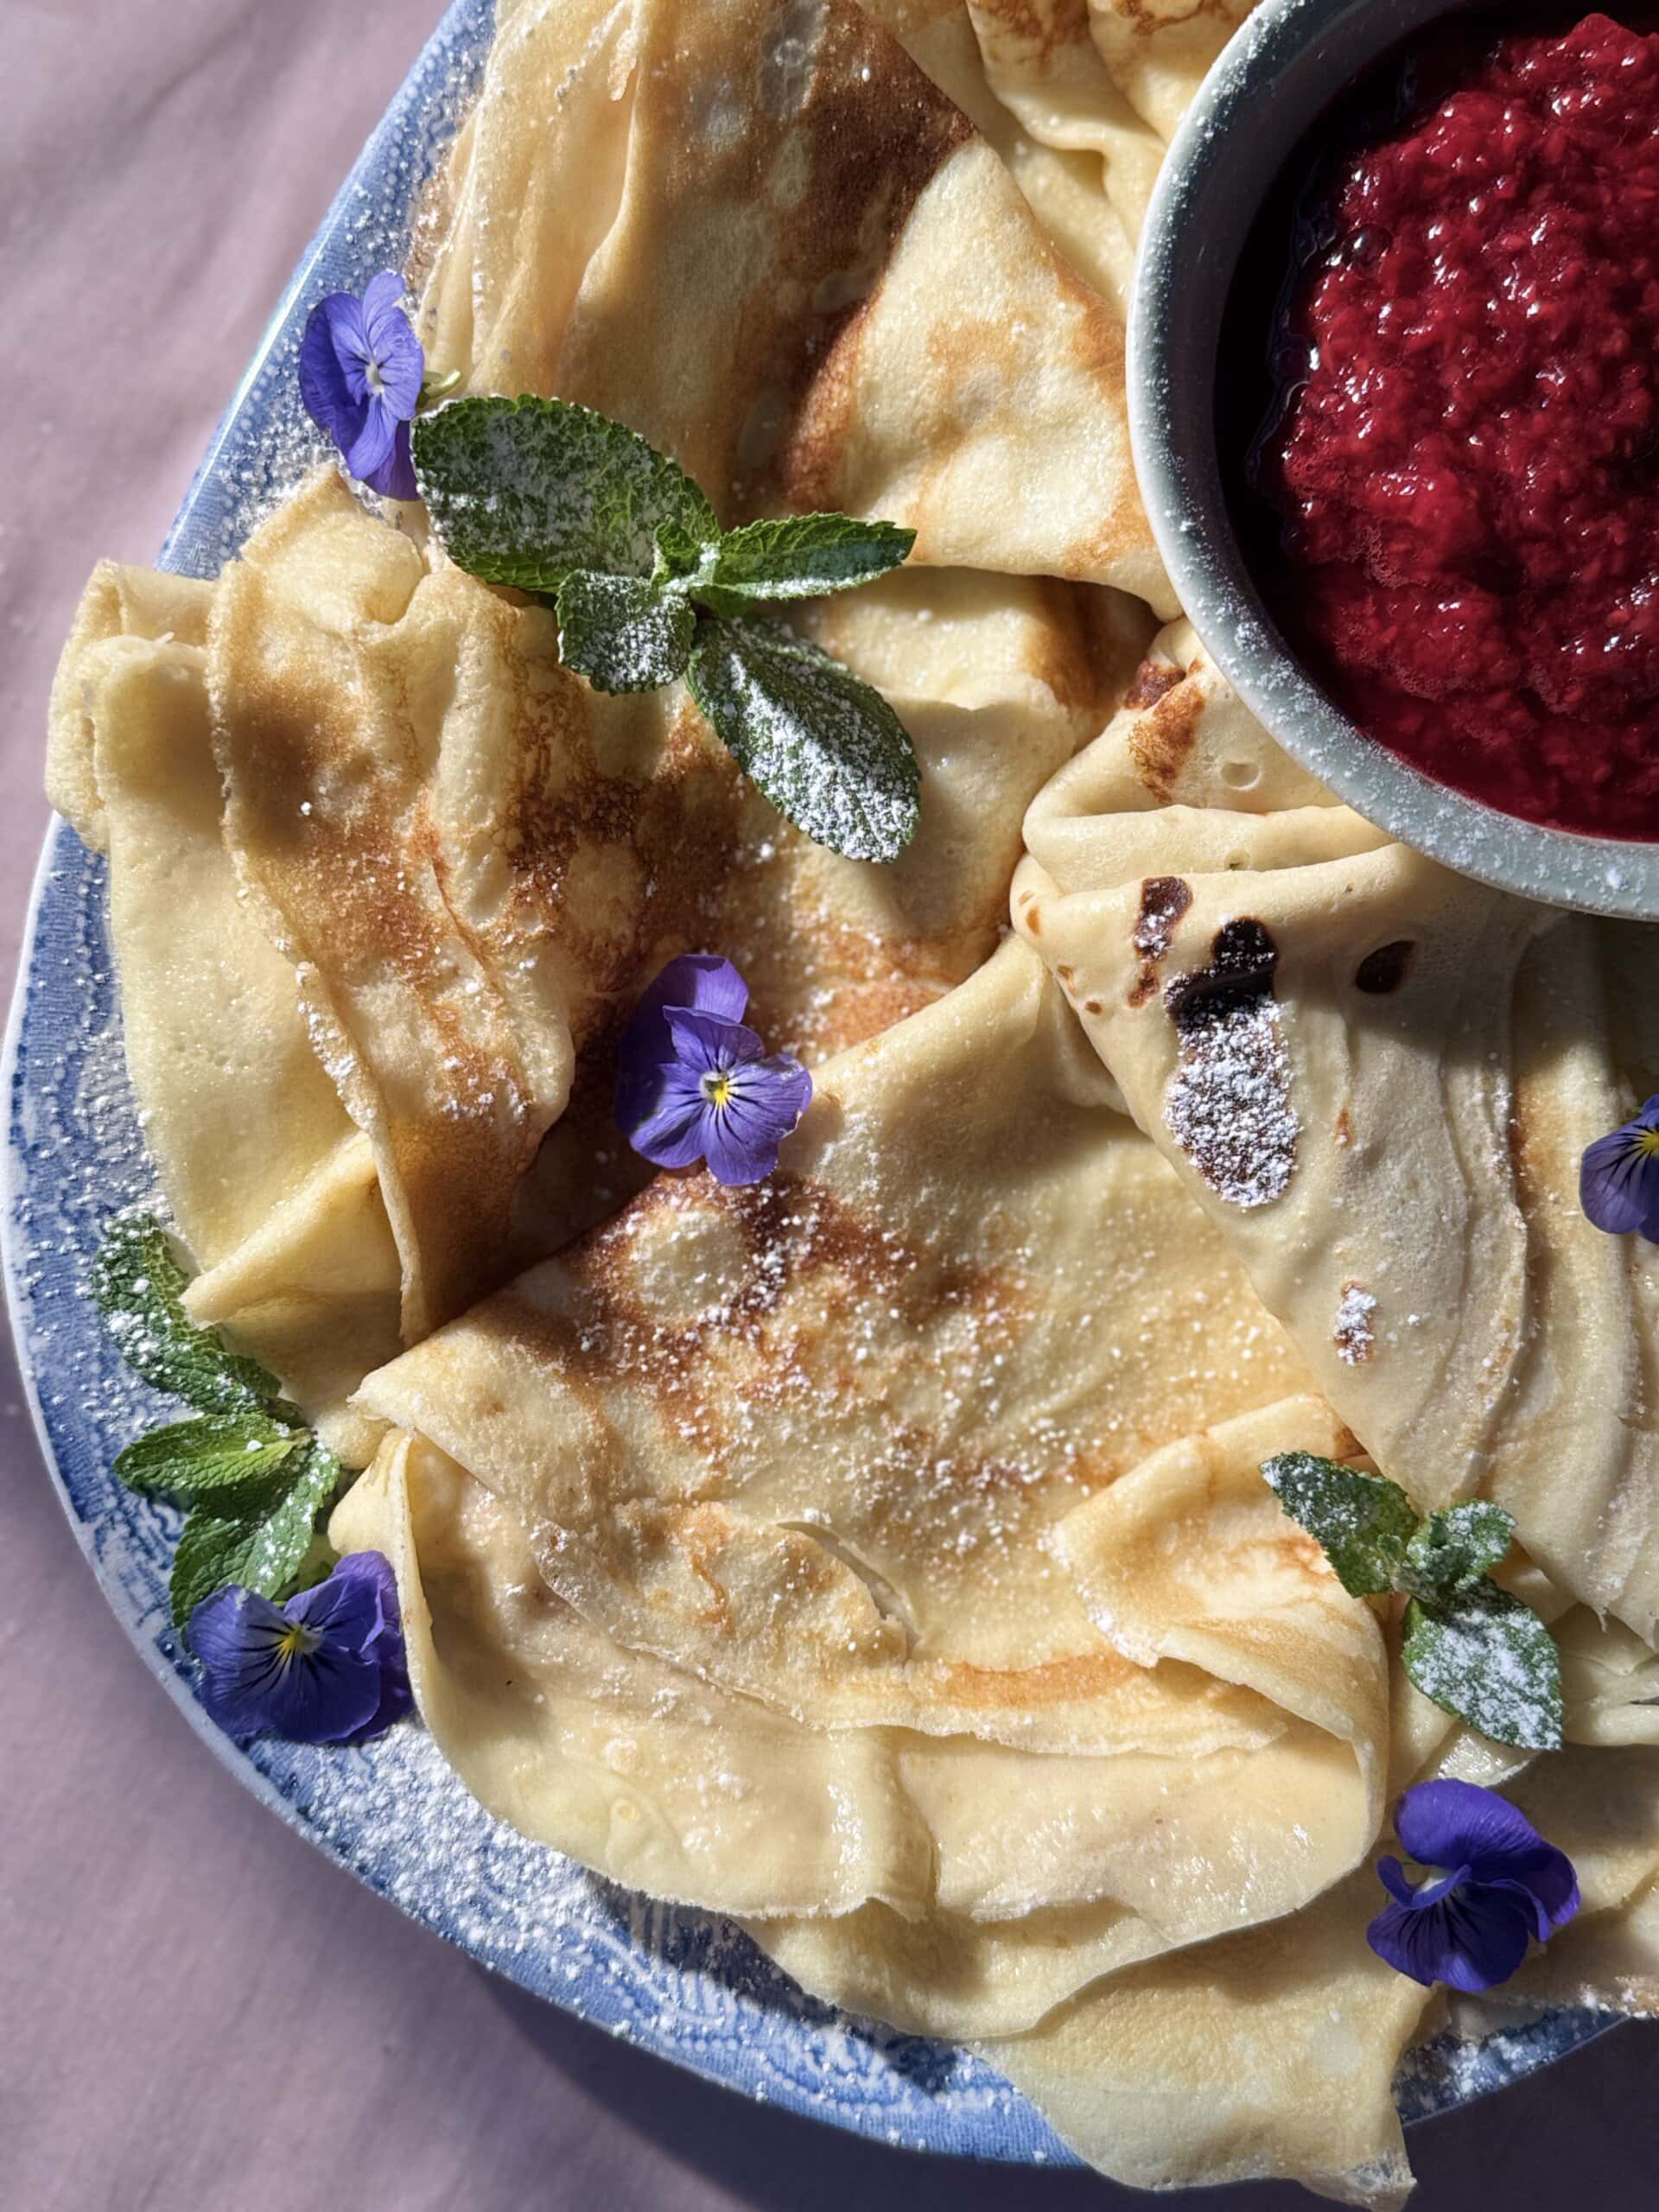
NINE: Keep the pannekaker warm in a low oven covered with foil. When ready to eat, fold into quarters and arrange on a plate.
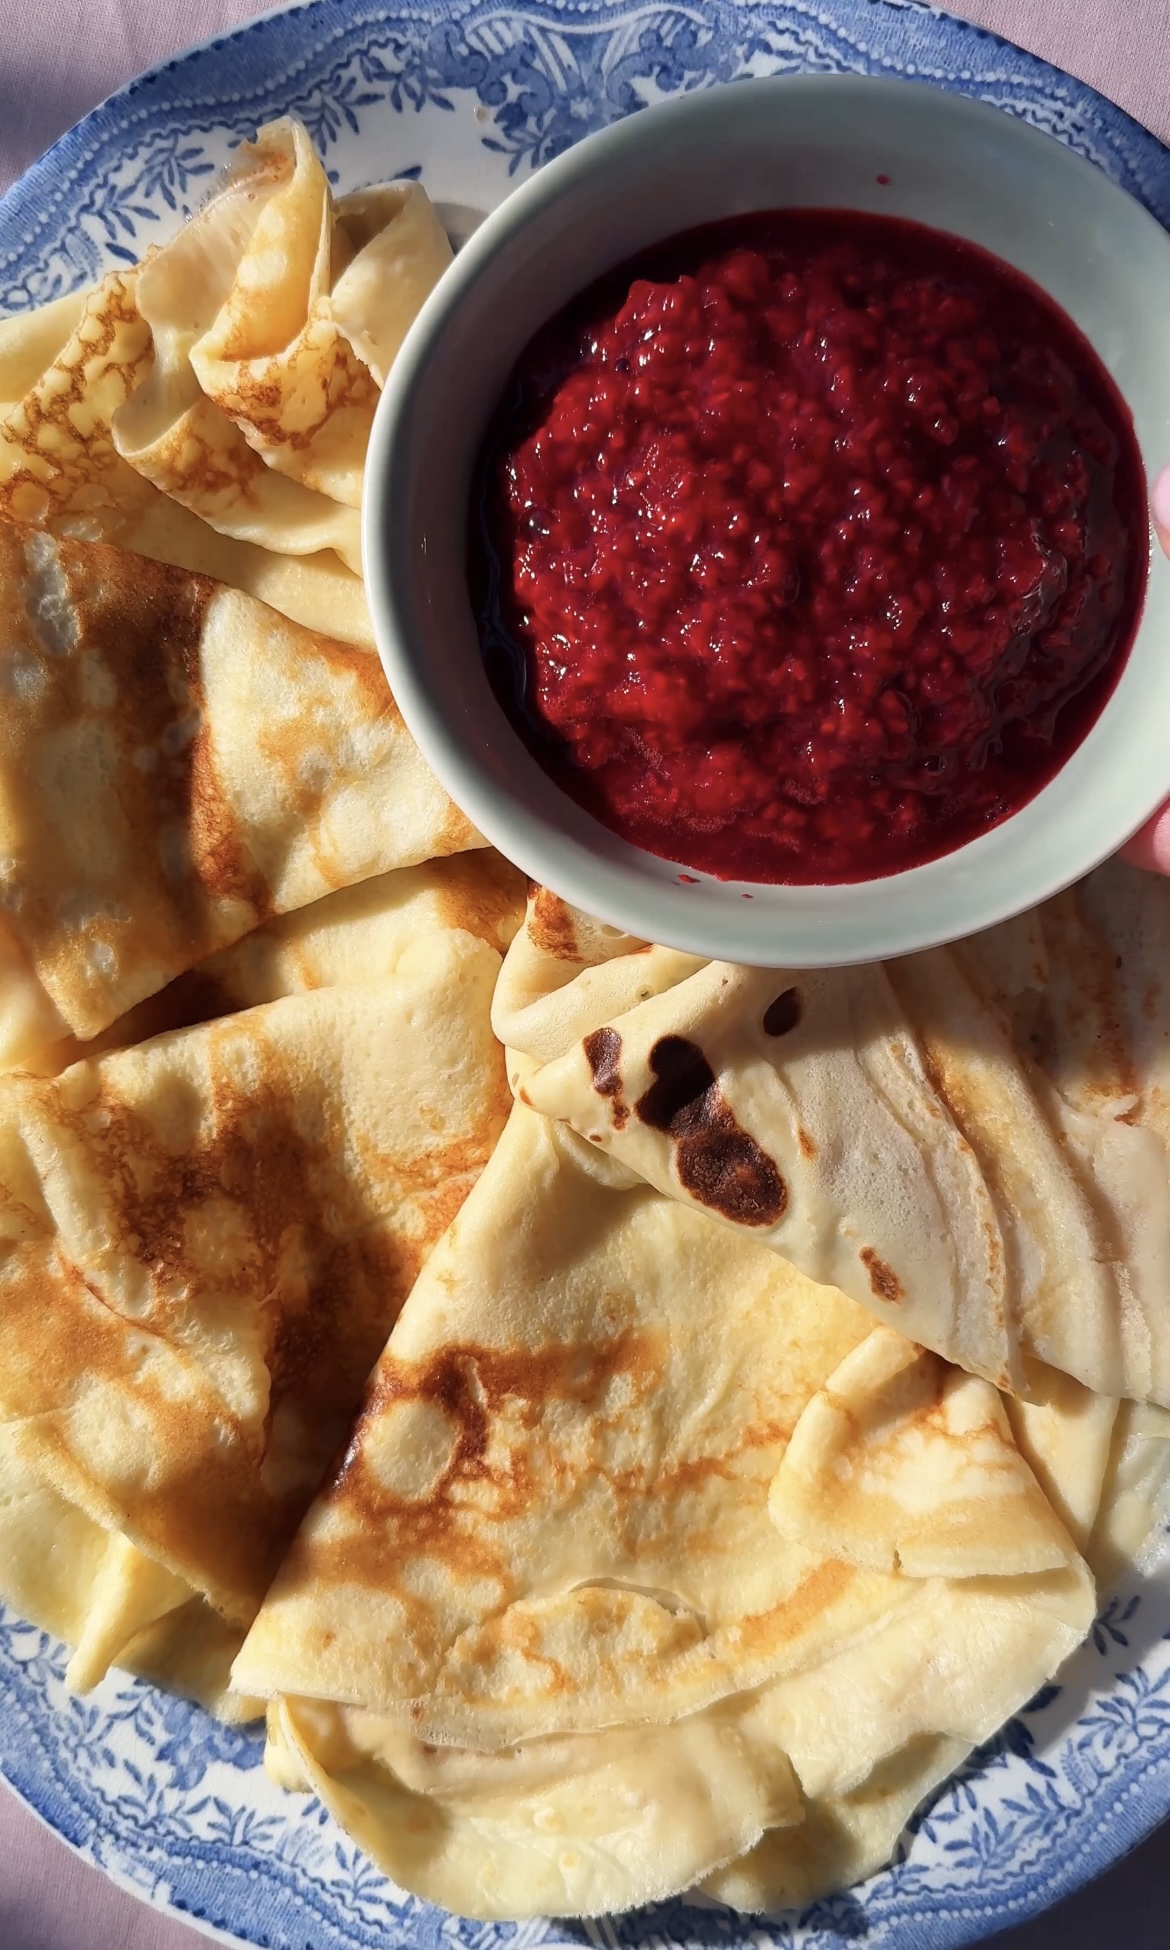
TEN: Serve with the raspberry compote and enjoy! I also like to add a dusting of icing sugar.
Cooking Tips:
Taste test: make sure you taste your raspberries to determine how much sugar and lemon to add to your raspberry compote. If they are a little on the tart side, add more sugar. If you find it a touch too sweet, simply add more lemon juice. Keep tasting and adjusting until you are happy with the balance of flavours.
Blitz it up: using a blender or food processor to whizz up the pannekaker batter makes it super simple to prepare. However, don’t worry if you only have a whisk and a mixing bowl. I recommend sieving the flour first to help avoid lumps.
Thin pannekaker: don’t be tempted to pour too much batter into the pan. Pannekaker are supposed to be thin like crêpes (hence the short cooking time), so you really don’t need much batter at all. Also, make sure you swirl the pan really well to get a nice even layer.
Chef’s perk: you may find the first pannekaker looks a little rustic. Don’t panic! You will soon get the hang of it as you go onto the next one and familiarise yourself with the pan, batter and technique. Just set the first one aside as a chef’s perk. Quality control is very important…
Pancake pan: a good pancake pan does make it easier to flip pannekaker as the sides are shallower. However, if you don’t have one, simply use a good-quality large non-stick frying pan.

Frequently Asked Questions
Pannekaker (pronounced ‘pahn-uh-kah-ker’) are delicately thin pancakes from Norway. They have a delicious rich, eggy flavour and light, airy texture. If you use eggs with deep golden yolks, your pannekaker will have a glorious golden hue. There are lots of versions of the traditional recipe, but they are traditionally served rolled or folded with sugar or blueberry jam.
Not too much. In fact, pannekaker are very similar to crêpes. Pannekaker recipes tend to include slightly more flour so they are often a little more chewy. They also have lots in common with the large, thin and crêpe-like British pancakes. However, they are very different from American pancakes which are thick and fluffy (due to the addition of baking powder).
No, all you need is a non-stick pan. A crepe pan is shallower so sometimes easier but not necessary.
They are delicious for breakfast, brunch or pudding with a whole host of toppings, particularly on Shrove Tuesday (pancake day). In Norway, pannekaker are often served as a second course at dinner time, with tomato or pea soup as the first course.
I love to serve my pannekaker with whipped cream, raspberry compote and a dusting of icing sugar. It is also very popular to serve Norwegian pancakes with lingonberry jam. However, like all pancakes, you can get creative and go with whatever you fancy. I love to add a drizzle of dark, milk or white chocolate. If I am in a rush, I swap the compote for a handful of berries or just warm up any flavour of jam. Alternatively, serve with your choice of spread. I switch it up between Nutella, Lotus Biscoff, my easy homemade pistachio cream or easy lemon curd for a zesty twist. You can also swap the whipped cream for clotted cream (so indulgent) or a swirl of squirty cream (this Président one is rather impressive). Maple syrup or runny honey are also delicious choices.
You can make the pannekaker batter the night before then cover and chill in the fridge overnight. It will need a good stir the next morning – you may also need to add a splash more milk if it has thickened up a little too much. Your final pannekaker might not be quite as fluffy as the gluten will have developed overnight, but it won’t make a huge difference. You can also make the raspberry compote in advance. Leave it to cool completely then cover and chill in the fridge for up to 3 days.
Yes, cool then stack up with sheets of greaseproof paper in between each crepe. Then clingfilm the whole thing tightly and place in a freezer bag (or wrap with a final layer of foil). Place in the freezer for up to 3 months. I wouldn’t freeze any pannekaker that have been filled or topped.
The berry compote can be frozen for up to 3 months. Transfer to an airtight container or freezer bag and place in the freezer. Defrost at room temp until liquid again and use as desired. If you want it warm, you could also add the frozen coulis to a pan over low-medium heat with a splash of water and defrost on the hob until smooth and warm.
Other recipes you might enjoy:
If you like these pannekaker you will love my banana crêpes. Also don’t miss my racuchy (Polish apple pancakes) and poffertjes (Dutch mini pancakes).

Pancake Recipes
Racuchy (Polish Apple Pancakes)

Pancake Recipes
Banana Crêpes

Pancake Recipes
Berry Crêpes with Cheesecake Cream

Easy Dessert Recipes
Mango Pancakes
If you tried this Pannekaker recipe or any other recipe on the site, please do leave a comment and let us know how it went!

Pannekaker (Norwegian Pancakes)
Ingredients
For the raspberry compote:
- 300 g fresh or frozen raspberries
- About 1-2 tsp caster sugar, to taste
- Zest of ½ lemon and about 1 tbsp lemon juice, to taste
For the pannekaker:
- 350 ml 1 ½ cups full-fat milk
- 3 large eggs
- 120 g 1 cup plain flour
- 1-2 tsp caster sugar
- pinch of flaky sea salt, about ¼ tsp
- Unsalted butter, for greasing
To serve:
- Raspberry compote
- Softly whipped cream
- Icing sugar, for dusting
- Sprigs of fresh mint
Instructions
- First make the raspberry compote: tip the raspberries into a medium-sized saucepan. Add the caster sugar, lemon zest and 1 tbsp water. Place over low-medium heat and slowly bring to the boil, stirring occasionally until the sugar dissolves. Once simmering, reduce the heat and cook gently for about 5 minutes – or until the raspberries have collapsed. Remove the raspberries from the heat and add lemon juice, to taste. Adjust the sweetness, if necessary. Pour into a bowl and set aside.
- Next, make the pannekaker: pour the milk into a blender and add the eggs, followed by the flour, sugar and salt. Blitz until you have a smooth batter. Alternatively, whisk everything together in a large mixing bowl until completely smooth – you may find it easier to sieve in the flour.
- Grease a large non-stick crepe or frying pan with butter and place over medium-high heat. Once hot, add a small ladleful of batter to the pan, tilting and swirling to ensure it evenly coats the base in a thin layer. Cook for about 30 seconds – or until the top has just set. The exact time will depend on the size of your pan, the heat of your hob and how thick your batter is. Once set, carefully flip the pancake over – you may find it easier to loosen it with a palette knife or spatula first. Continue to cook for a further 10 seconds on the other side – or until lightly golden. Slide onto a plate and cover loosely with foil to keep warm. Repeat with the remaining batter, greasing with more butter if necessary, until you have around 6 pannekaker.
- Serve the pannekaker warm with the raspberry compote, whipped cream, a dusting of icing sugar and sprigs of fresh mint.
Notes
Nutrition
Nutrition information is automatically calculated, so should only be used as an approximation.


Almost like a crepe but a bit lighter. A great one to try and it worked really well with the raspberry compote!