Pannekaken (Norwegian Pancakes)
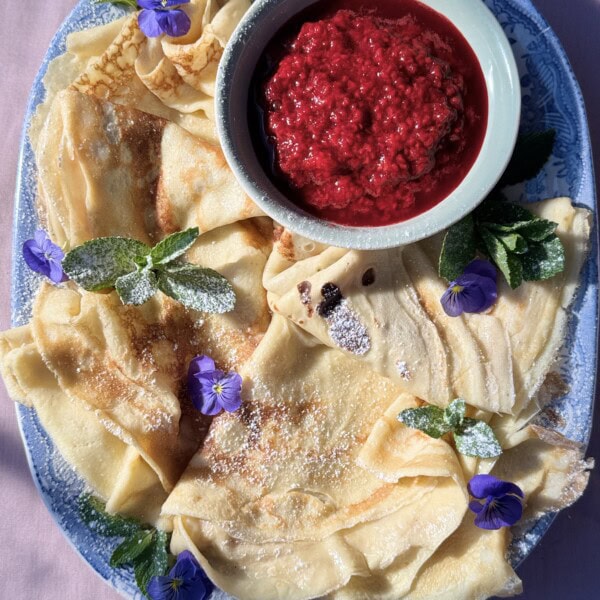
These classic pannekaken (Norwegian pancakes) are utterly irresistible. Delicately thin like French-style crêpes, they are delicious with a host of toppings for breakfast, brunch or dessert - and ideal for Shrove Tuesday (pancake day)!
- Prep Time: 10 minutes
- Cook Time: 10 minutes
- Total Time: 20 minutes
- Yield: Serves 3
- Category: Pancakes
- Method: Stove
- Cuisine: Norwegian
- Diet: Vegetarian
Ingredients
For the raspberry compote:
- 300g fresh or frozen raspberries
- About 1-2 tsp caster sugar, to taste
- Zest of ½ lemon and about 1 tbsp lemon juice, to taste
For the pannekaken:
- 350 ml (1 ½ cups) full-fat milk
- 3 large eggs
- 120g (1 cup) plain flour
- 1-2 tsp caster sugar
- pinch of flaky sea salt (about ¼ tsp)
- Unsalted butter, for greasing
To serve:
- Raspberry compote
- Softly whipped cream
- Icing sugar, for dusting
- Sprigs of fresh mint
Instructions
- First make the raspberry compote: tip the raspberries into a medium-sized saucepan. Add the caster sugar, lemon zest and 1 tbsp water. Place over low-medium heat and slowly bring to the boil, stirring occasionally until the sugar dissolves. Once simmering, reduce the heat and cook gently for about 5 minutes - or until the raspberries have collapsed. Remove the raspberries from the heat and add lemon juice, to taste. Adjust the sweetness, if necessary. Pour into a bowl and set aside.
- Next, make the pannekaken: pour the milk into a blender and add the eggs, followed by the flour, sugar and salt. Blitz until you have a smooth batter. Alternatively, whisk everything together in a large mixing bowl until completely smooth - you may find it easier to sieve in the flour.
- Grease a large non-stick crepe or frying pan with butter and place over medium-high heat. Once hot, add a small ladleful of batter to the pan, tilting and swirling to ensure it evenly coats the base in a thin layer. Cook for about 30 seconds - or until the top has just set. The exact time will depend on the size of your pan, the heat of your hob and how thick your batter is. Once set, carefully flip the pancake over - you may find it easier to loosen it with a palette knife or spatula first. Continue to cook for a further 10 seconds on the other side - or until lightly golden. Slide onto a plate and cover loosely with foil to keep warm. Repeat with the remaining batter, greasing with more butter if necessary, until you have around 6 pannekaken.
- Serve the pannekaken warm with the raspberry compote, whipped cream, a dusting of icing sugar and sprigs of fresh mint.
Notes
Scroll up for a helpful step by step guide to help you make pannekaken.
To store: pannekaken are best enjoyed straight away as the texture stays light and fluffy. However, you can keep any cooked pannekaken covered and chilled in the fridge for up to 2 days.
To reheat: you can reheat the pannekaken in the microwave in a loosely covered microwave-proof container. The exact time will depend on the number you are reheating and the strength of your microwave - I like to do 15-second blasts until hot. Watch closely as you don’t want to overheat them or they will become rubbery. You can serve the raspberry compote warm or cold - simply reheat in a pan until warm or in 15-second increments in the microwave in a microwave-proof bowl.
To freeze: you can freeze the cooked pannekaken and raspberry compote in separate sealed containers for up to 2 months. Defrost before reheating.
Make ahead: You can make the pannekaken batter the night before then cover and chill in the fridge overnight. It will need a good stir the next morning - you may also need to add a splash more milk if it has thickened up a little too much. Your final pannekaken might not be quite as fluffy as the gluten will have developed overnight, but it won’t make a huge difference. You can also make the raspberry compote in advance. Leave it to cool completely then cover and chill in the fridge for up to 3 days.
Taste test: it is important to taste your raspberries to determine how much sugar to add to your raspberry compote. If they are a little on the tart side, add more sugar. If you find that your finished raspberry compote is a touch too sweet, simply add more lemon juice. Keep tasting and adjusting until you are happy with the balance of flavours.
Blitz it up: using a blender or food processor to whizz up the pannekaken batter makes these super simple to prepare. However, don’t worry if you only have a whisk and a mixing bowl. I recommend sieving the flour first to help avoid lumps.
Thin pannekaken: don’t be tempted to pour too much batter into the pan when making pannekaken. They are designed to be thin like crêpes (hence the short cooking time), so you really don’t need that much at all. Also make sure you swirl the pan really well to get a nice even layer.
Chef’s perk: like classic British pancakes, you may find the first pannekaken looks a little less than perfect. Don’t panic! You will soon get the hang of it as you go onto the next one and familiarise yourself with the pan, batter and technique. Just set the first one aside as a chef’s perk. Quality control is very important…
Serving size: this recipe makes around 6 pannekaken. I like to serve 2 per person so I would say it makes enough for 3. However, all appetites vary and it depends on what you like to serve your pannekaken with. You can also double or triple the quantities to scale up if cooking for a crowd.
Find it online: https://desertislanddishes.co/pannekaken-norwegian-pancakes/