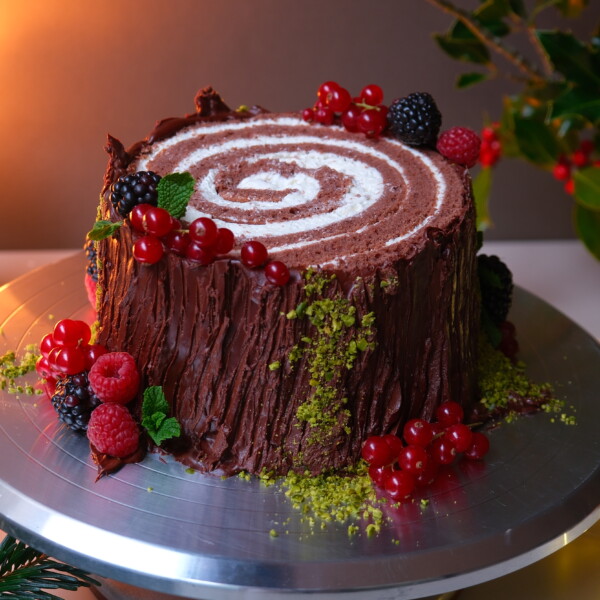
Bûche de Noël (Yule Log Cake)
Looking for a classic Christmas cake with a twist? This bûche de noël (yule log cake) is the perfect festive show stopper. Imagine swirled layers of light chocolate sponge, sweet whipped cream and rich dark chocolate ganache. All shaped into a stunning log stump and decorated with crunchy pistachios, fruity berries and fresh mint. The best alternative to Christmas pudding for chocolate fans!
- Prep Time: 40 minutes
- Cook Time: 10 minutes, plus cooling
- Total Time: 50 minutes, plus cooling
- Yield: Serves 8-10 1x
- Category: Baking
- Method: Oven
- Cuisine: French
Ingredients
For the cake:
- 125g ground almonds (almond flour)
- 125g icing sugar
- 20g plain flour
- 10g cocoa powder
- 3 large eggs, plus 3 egg whites (weighing 90g)
- 15g caster sugar
- For the cream:
- 200g double cream
- 40g icing sugar
For the chocolate ganache:
- 250g good-quality dark chocolate, chopped
- 200g double cream
To decorate:
- Fresh berries
- Chopped pistachios
- Sprigs of fresh mint
Instructions
- Preheat the oven to 200C / 180C Fan. Grease and line a 30x40 cm (12x16-inch) rectangular baking tray with non-stick baking paper. Set aside.
- In a large mixing bowl, sift together the ground almonds, icing sugar, flour and cocoa powder.
- Add the whole eggs and, using an electric whisk, whisk for about 10 minutes - or until pale and airy.
- In a separate bowl, whisk the egg whites with the caster sugar until soft peaks form.
- Gently fold the whisked egg whites into the egg-flour mixture in batches - take care not to deflate the batter.
- Carefully spread the batter onto the prepared baking tray - it should be about 1 cm thick. Bake in the oven for 7–10 minutes - or until the surface is just set and lightly golden. Leave to cool completely.
- Meanwhile, prepare the cream: pour the cream into a large mixing bowl (ideally chilled) and add the icing sugar. Whisk until medium peaks form - take care not to over whisk. Cover and chill in the fridge until needed.
- To assemble: remove the cooled cake from the tin and cut lengthwise into 3 equal-sized long strips.
- Place one strip of cake on a flat surface lined with cling film. Using the back of a spoon or a palette knife, spread a thin layer of the whipped cream on top. Using the cling film to guide, roll the cake into a tight spiral.
- Attach the second strip of cake by pressing the edge against the roll. Spread whipped cream on the second strip and continue rolling. Repeat with the third strip. Place onto a serving plate.
- Next, make the ganache: put the chopped chocolate into a heat-proof bowl. Add the double cream and set over a pan of gently simmering water - make sure the bottom of the bowl doesn’t come into contact with the water. Stir gently until melted and smooth. Alternatively, pop the chopped chocolate and cream into a microwave-safe bowl and heat in 20-second bursts, stirring between each one, until melted and smooth. Set aside to cool and thicken slightly before decorating (this is normally between 5-15 minutes depending on the temperature of your kitchen.
- To decorate: spread the ganache evenly over the sides of the rolled cake. Use a fork to create a wood/bark pattern for a rustic effect. I like to leave the top ganache-free so you can see the beautiful cream swirl. Decorate with fresh berries, chopped pistachios and sprigs of fresh mint. Enjoy!
Notes
Whipped cream: take care to whip the cream just to medium peaks for the filling. If you over whip, it will split and you will eventually get something akin to butter.
Ganache: if your kitchen is very warm, make the ganache before you start to assemble the cake. That way it will have time to thicken enough to spread.
Make ahead: apart from the egg yolks, this is a fat-less sponge so doesn’t last too long. However, you can make the sponge the day before and keep it very well wrapped in cling film. Equally, you can whip the cream a day in advance and keep covered and chilled in the fridge. Then follow the steps for the ganache and assemble the following day. You can make the ganache the day before and keep it covered and chilled. But bear in mind you will have to warm it, then leave it to cool slightly before decorating. Once made, keep it very well covered and chilled in the fridge (due to the cream). Enjoy within 3 days of making the sponge.
Freezing instructions: I wouldn’t recommend freezing the final bûche de noël due to the cream. However, you can freeze the sponge after baking. Leave it to cool completely before wrapping tightly in cling film and freezing for up to 3 months. Allow to defrost fully before assembling.
Find it online: https://desertislanddishes.co/buche-de-noel-yule-log-cake/
